If you’ve been thinking about growing your own potatoes, now’s the time. But before you get started, you need to consider the right planting approach for your yard. A few years ago, I conducted a test: I grew German Butterball potatoes using seven different planting methods. Throughout the course of the growing season, the pros and cons of each became quite transparent.
Take a look at the different planting methods you can consider, including those that worked the best and which ones delivered less-than-stellar results.
Cheapest: Hilled Rows

Mitch Mandel
Dig straight, shallow trenches, 2 to 3 feet apart, in prepared soil. Plant seed potatoes 12 inches apart and cover with about 3 inches of soil. When the shoots reach 10 to 12 inches tall, use a hoe or shovel to scoop soil from between rows and mound it against the plants, burying the stems halfway. Repeat as needed through the growing season to keep the tubers covered.
Unlike container gardening, there’s nothing to buy or build and no soil to transport. This is a simple, inexpensive, and proven method that farmers have used for millennia. It’s practical for large-scale plantings, also.
However, the quality of the soil may limit the yield. In places where the dirt badly compacted or low in organic matter, an above-ground technique might work better.
Here’s a video that shows this potato-planting method:
Least Digging: Straw Mulch

Mitch Mandel
Place seed potatoes on the surface of prepared soil following the spacing specified for hilled rows and cover them with 3 to 4 inches of loose, seed-free straw. Mound more straw around the stems as they grow, eventually creating a layer of one foot or more in depth.
The benefit here is that the thick mulch conserves soil moisture and smothers weeds. Harvest is effortless with no digging, and this method is suggested as a way to thwart the Colorado potato beetle. However, this produced a smaller yield than the hilled row and field mice have been known to use eat the crops under the cover of the straw.
Biggest Yield: Raised Beds

Mitch Mandel
Loosen the soil in the bottom of a half-filled raised bed. Space seed potatoes about 12 inches apart in all directions and bury them 3 inches deep. As the potatoes grow, add more soil until the bed is filled. If possible, simplify harvest by removing the sides.
This method yielded the largest harvest in my trials, and the potatoes were uniformly large in size. Raised beds are a good choice where the garden soil is heavy and poorly drained. The downside: The soil to fill the bed has to come from somewhere — and it takes a lot.
Good for DIYers: Wood Boxes
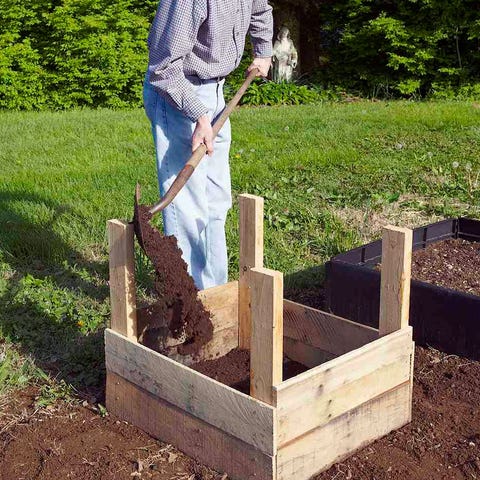
Mitch Mandel
Build or buy a bottomless square box — I used lumber from discarded pallets — and plant the same as for a raised bed. The box is designed so you can add additional slats and soil as the plants grow. In theory, you can temporarily remove the bottom slat for harvesting, or just tip it over.

How to Grow Potatoes in a Box
This is another strategy for growing potatoes where the ground soil is of poor quality. It yielded a similar quantity to the raised bed. However, a lot of time and effort went into building the box and I felt the results did not justify the effort.
Best for Wet Yards: Wire Cylinders

Mitch Mandel
Using hardware cloth with ¼-inch mesh, fashion a cylinder about 18 inches in diameter and 24 inches tall. Put several inches of soil in the bottom, then plant three or four seed potatoes and cover them with 3 inches of soil. Continue to add soil as the potatoes grow. To harvest, lift the cylinder and pull the soil back to expose the tubers.

44 Easy and Satisfying Potato Recipes to Try
In a climate with incessant spring rains, the wire mesh would provide excellent drainage and prevent the soil from getting waterlogged. This is another raised technique to consider where garden soil is poor. Unfortunately, I only harvested a small number of undersized tubers from the cylinders — a dismal showing, probably because the soil-compost mixture I used dried out so quickly that the plants lacked adequate moisture.
Easiest Harvest: Grow Bags
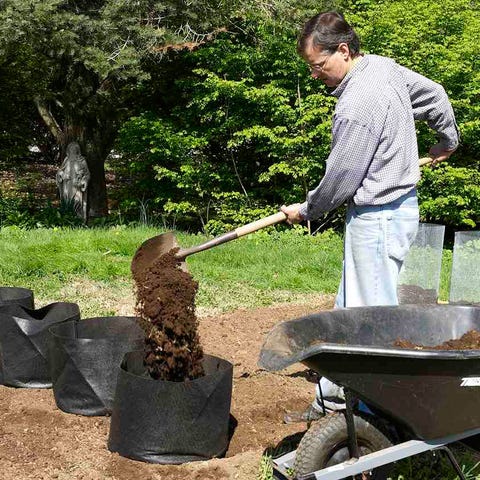
Mitch Mandel
Commercial growing bags are made with heavy, dense polypropylene. Put a few inches of a soil-compost mixture in the bottom of a bag, then plant three or four seed potato pieces and cover with 3 inches of soil. Continue adding soil as the plants grow until the bag is full. To harvest, turn the bag on its side and dump out the contents.
Grow bags can go on patios or driveways or where garden soil lacks nutrients. The bags should last for several growing seasons. Their dark color captures solar heat to speed early growth. Harvest is simple and the yield can be impressive, considering the small space each bag occupies. However, this can be a pricey technique. The brand of bag I used costs $12.95.
Best to Skip: Garbage Bags
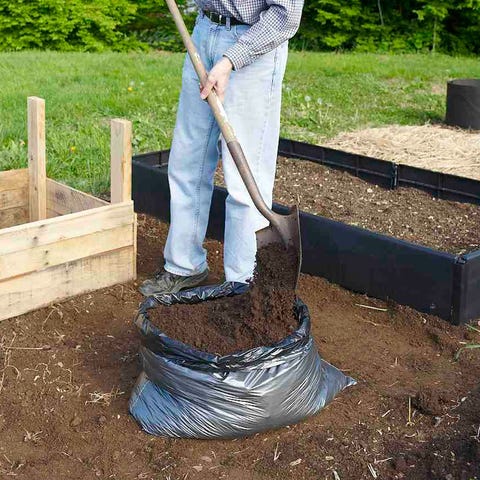
Mitch Mandel
Fill a large plastic garbage bag the same way as a grow bag, punching a few holes through the plastic for drainage. Roll the top edge of the bag to help it stay upright; otherwise the bag will sag and spill soil. To harvest, rip the bag and pour out the contents.
Like the grow bags, a garbage bag can be employed where in-ground growing is not an option. Black bags capture solar heat to speed early growth. Aesthetically, however, this is the least appealing choice. Our yield was meager, perhaps because the thin plastic allowed the soil to heat up too much, limiting tuber formation.
This content is created and maintained by a third party, and imported onto this page to help users provide their email addresses. You may be able to find more information about this and similar content at piano.io